Entertainment · Israel · Music · Tel Aviv · Tourism

Israeli Folk Dancers – Saturdays on the Tel Aviv Boardwalk

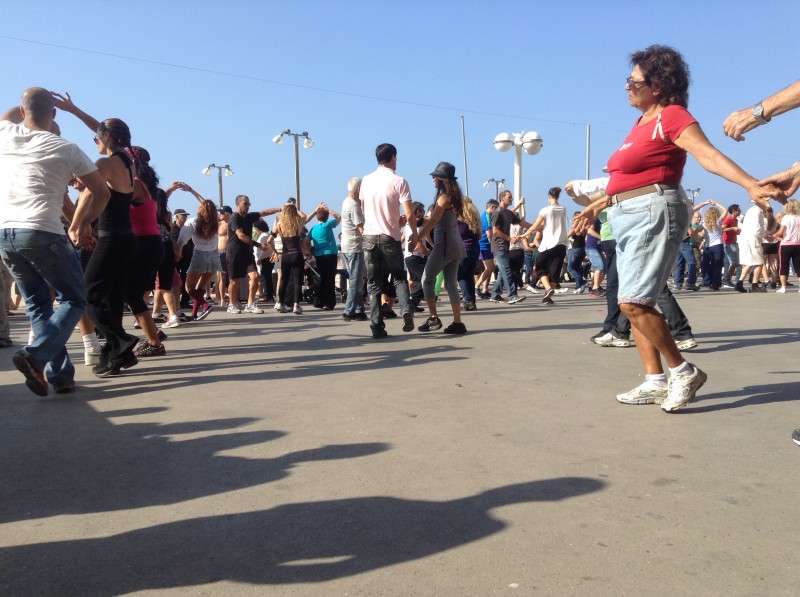
Rak be’Israel (only in Israel) can you find those weekly Saturday gatherings of Israeli folk dancers on the Tel Aviv tayelet (boardwalk). They’ve been there for years, attracting not only pure dance aficionados but passers by from around the world. So many pictures and videos taken. Have a look at this tv item broadcasted on France2 a few years ago: http://www.youtube.com/watch?v=PtrWXUt3NyM – at 1’43”

We shouldn’t really call them folk dancers since most of the dances and choreographies evolve with contemporary Israeli music. It started of as Israeli folk dancing, which is a dance form usually performed to music from Israel, with dances choreographed for specific songs. Most Israeli dances are performed in a circle, although there are also partner dances and line dances. For our Belgian readers interested in learning to dance Israeli Folk Dance, contact Rikske from Isradans

Personally, I find it amazing and it brings me joy and happiness to see that this is what people do on their Saturdays. Quality of life. Have a look:

IMG_3037 IMG_3038 IMG_3039 IMG_3043 IMG_3048 IMG_3053 IMG_3068

Here’s some nostalgia footage of what it used to be like

Or this one by Avi Toledano at the 1979 Eurovision

Or this Israeli Group in France in the sixties


Baking · Israel · Judaism · Tutorial

Tutorial: How to make Challah Bread

It’s Friday again, it’s Shabbat again; let’s make Challah Bread. A lot of people discourage you from making Challah as it is a complicated process and the success of it lies it the little details. Luckily there’s Tori Avey’s website Theshiksa to help us out. It’s only when I use her tips that my Challah comes out great.

Ingredients

  • 1 1/2 cups lukewarm water, divided
  • 1 packet active dry yeast
  • 1 tsp sugar
  • 1 egg
  • 3 egg yolks
  • 1/3 cup honey
  • 2 tbsp canola oil
  • 2 tsp salt
  • 4 1/2 to 6 cups flour
  • Egg Wash Ingredients: 1 egg, 1 tbsp cold water, 1/2 tsp salt
  • Optional Ingredients: Raisins, chocolate chips (1 ½ cups of either)
  • Optional Toppings: Sesame seeds, poppy seeds, kosher salt

You will also need: Large mixing bowl, whisk or mixer, kitchen towel, cookie sheet, parchment paper, plastic wrap, pastry brush – Servings: 1 very large challah, 2 regular challahs, or 24 mini challah rolls – Kosher Key: Parve

Instructions:

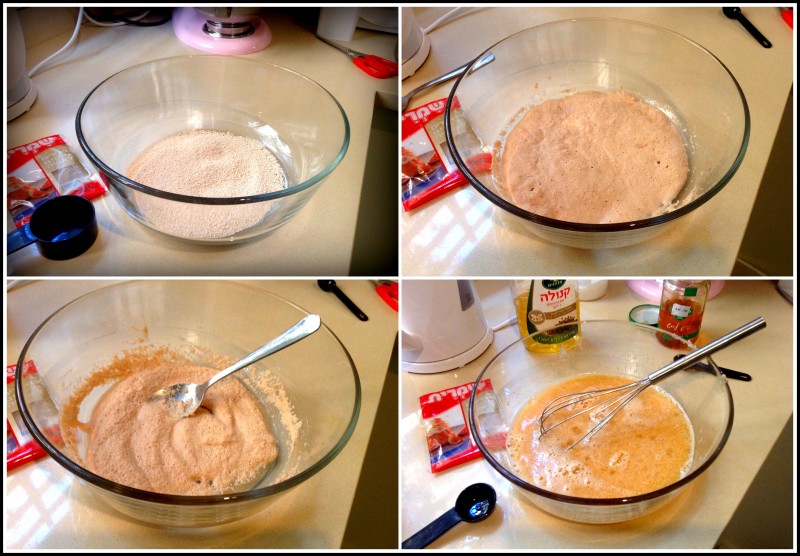
  1. Pour ¼ cup of the lukewarm water (about 110 degrees) into a large mixing bowl. Add 1 packet of Active Dry Yeast and 1 tsp of sugar to the bowl, stir to dissolve. Wait 10 minutes. The yeast should have activated, meaning it will look expanded and foamy. If it doesn’t, your yeast may have expired, which means your bread won’t rise—go buy some fresh yeast!
  2. Once your yeast has activated, add remaining 1 ¼ cup lukewarm water to the bowl along with the egg, egg yolks, honey, canola oil and salt. Use a whisk to thoroughly blend the ingredients together. Recently Updated1
  3. Begin adding the flour to the bowl by half-cupfuls, stirring with a large spoon each time flour is added. When mixture becomes too thick to stir, use your hands to knead.
  4. Continue to add flour and knead the dough until it’s smooth, elastic, and not sticky. The amount of flour you will need to achieve this texture varies—only add flour until the dough feels pliable and “right.” If you plan to add raisins or chocolate chips to the challah, incorporate into the dough as you knead.Recently Updated2
  5. Place a saucepan full of water on the stove to boil.
  6. Meanwhile, remove the dough from your mixing bowl and wash out the bowl. Grease the bowl with canola oil. Push the dough back into the bottom of the bowl, then flip it over so that both sides are slightly moistened by the oil.
  7. Cover the bowl with a clean, damp kitchen towel. Place the bowl of dough on the middle rack of your oven. Take the saucepan full of boiling water and place it below the rack where your dough sits. Close the oven, but do not turn it on. The pan of hot water will create a warm, moist environment for your dough to rise. Let the dough rise for 1 hour.
  8. Take the dough bowl out and punch it down several times to remove air pockets. Place it back inside the oven and let it rise for 1 hour longer.
  9. Take the dough out of the oven. Flour a smooth surface like a cutting board. Punch the dough down into the bowl a few times, then turn the dough out onto the floured surface. Knead for a few minutes, adding flour as needed to keep the dough from feeling sticky.
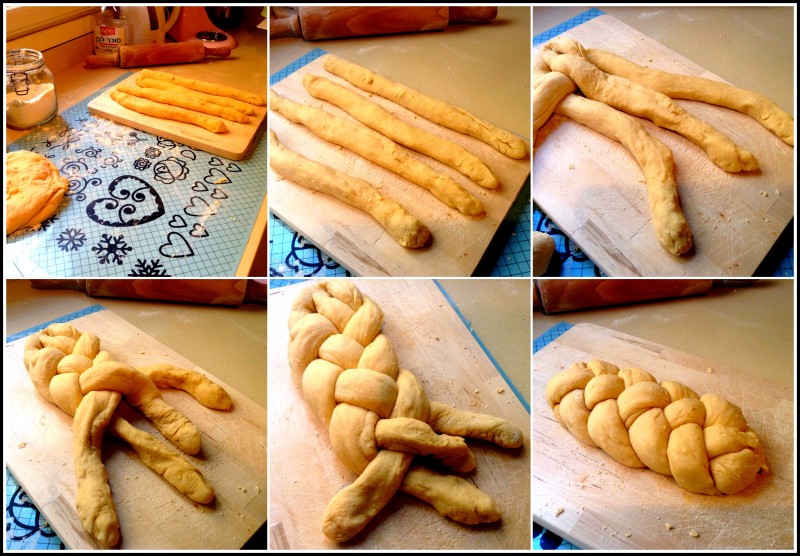
  10. Now your dough is ready to braid. If you plan to separate and bless the challah, do it prior to braiding. Click here to learn how to braid challah.Recently Updated3
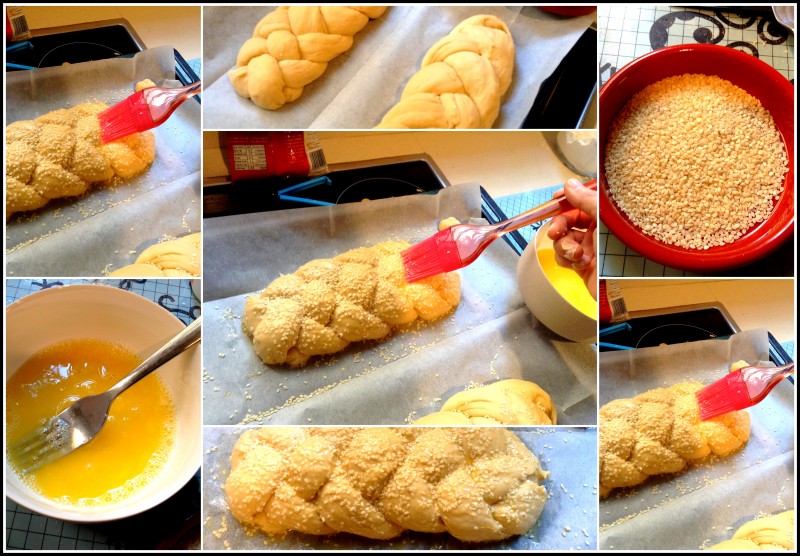
  11. After you’ve braided your challah, place it on a cookie sheet lined with parchment paper (this will catch any spills from your egg wash and keep your challah from sticking to the cookie sheet).
  12. Note: you can put a single challah braid on a cookie sheet, since they tend to expand a lot when baking.
  13. Prepare your egg wash by beating the egg, salt and water till smooth. Use a pastry brush to brush a thin layer of the mixture onto the visible surface of your challah. Reserve the leftover egg wash.2013-10-111
  14. Let the braid rise 30 to 45 minutes longer. You’ll know the dough is ready to bake when you press your finger into the dough and the indentation stays, rather than bouncing back.
  15. Heat oven to 350 degrees F. The challah needs to bake for about 40 minutes total, but to get the best result the baking should be done in stages. First, set your timer to 20 minutes and put your challah in the oven.
  16. After 20 minutes, take the challah out of the oven and coat the center of the braid with another thin layer of egg wash. This area tends to expand during baking, exposing areas that will turn white unless they are coated with egg wash.
  17. Turn the tray around, so the opposite side is facing front, and put the tray back into the oven. Turning the tray helps your challah brown evenly—the back of the oven is usually hotter than the front.
  18. The challah will need to bake for about 20 minutes longer. For this last part of the baking process, keep an eye on your challah—it may be browning faster than it’s baking. Once the challah is browned to your liking, take the tray out and tent it with foil, then place it back in the oven. Remove the foil for the last 2 minutes of baking time.2013-10-112
  19. Take the challah out of the oven. At this point your house should smell delicious. You can test the bread for doneness by turning it over and tapping on the bottom of the loaf—if it makes a hollow sound, it’s done. Let challah cool on the baking sheet or a wire cooling rack before serving.
  20. This recipe will make 1 very large challah, 2 regular challahs, or 24 mini challah rolls. I usually divide the dough in half to make 2 medium challahs, which are more manageable and easier to braid than a large one. Choose what works best for you. 2013-10-113Shabat Shalom
Baking · DIY · Tutorial · Uncategorized

Tutorial: Marilyn’s Apple Pie

Are we allowed to post a tutorial for baking on our blog? Hell’s yeah. I never come empty handed to family or Shabbat dinners. Therefore I’m always looking for new creations in the kitchen. Today I’m sharing an apple pie recipe that is based on existing ones but where I’ve added my own imagination and the ultimate secret ingredient* that makes the difference. Thank you Delicatessen for the inspiration and thank you Tori Avey from TheShiksa.com for the basic recipe.

Ingredients:

  • 5 ripe granny smith apples – peeled2013-10-053
  • feel free to add 2 or more other apples
  • a bowl of dried raisins
  • 1/4 cup butter
  • 1/2 cup orange juice
  • 1/2 lemon, juiced
  • 1/3 cup white sugar
  • 5 tbsp brown sugar
  • 1 1/2 tsp cinnamon
  • 1 tsp (or more depending on your taste of) Cardamom*
  • 1 tsp vanilla
  • 1/4 tsp nutmeg
1. Start with the crust. Some people buy it. Some people make it. To make your own dough, you can use this website. Once your dough is cooling off in the fridge you can turn on your oven, heat it to 175°C and prepare a preferably round oven dish with some parchment paper.
IMG_26602. Cut your apples either in small little chopped squares or just cut them in to thin slices.

IMG_26613. Meanwhile, heat the butter in a medium saucepan. Then add the apples and raisins and then the orange juice, lemon, sugars, vanilla, cinnamon, nutmeg and cardamom. Bring them to a boil and stir occasionally until you obtain a nice mixture and a great smell. Cover the pan and cook on medium heat for exactly 8 minutes, stirring occasionally. Do not overcook. Uncover apples at the end of cooking and remove from heat and allow to cool.

IMG_2662IMG_26644. To prepare the dough – whether from your fridge or freezer – make sure it’s not too cold so you can work it. Roll out the dough with a tool or with you hand as flat as possible. Place the flattened dough in your recipient, cut off hanging borders and keep some for the top coat. You can use your fantasy for the top coat. I try to make a little apple too for those who can see. Poor in the apple mixture. Then finish with your top coat. When preparing the actual pie, I always make some tiny little individual portions to share and taste.IMG_2666

Collages1

IMG_26775. Bake pie for 45-50 minutes, until the top is golden brown and pie is cooked through. Serve warm or cold, whith some vanilla ice or not. Bon appétit.

IMG_2675